Pages

Friday, November 30, 2012

50 Fabulous Paper Pieced Stars Update

Well, I thought this was finished.  It was bound, washed and on on my bed!  Then I realized that it didn't come down to cover the side boards on our bed.  I don't know what I was thinking of...  I was focused on having 7 x 7 blocks, for a total of 49.   7 x 12" is 84," right? 

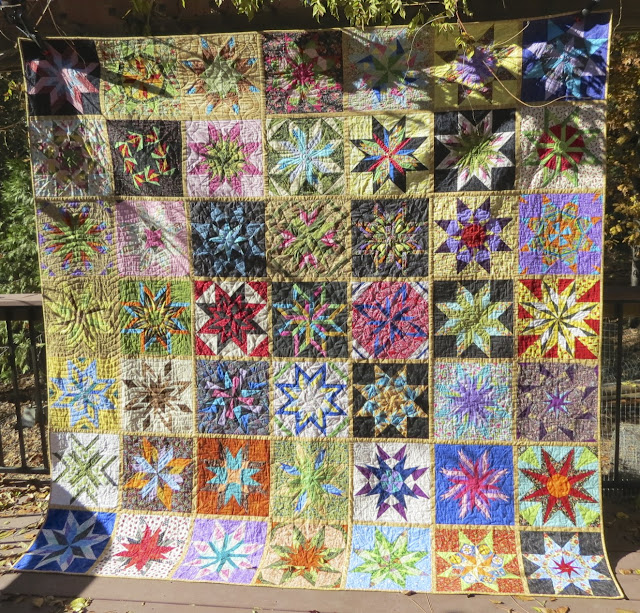
I know how big my bed is, and it did not occur to me until yesterday that I should have made more stars, or added a border, since I really need 96."

So the other day I went to buy some fabric to make a border.  It will be 6" wide and green.  It will be quilted and then added in QAYG.  I am kind of excited about trying this, having read about several ways of doing it.  And I can practice some border busting designs!!!

Luckily I had enough backing and sashing fabric left, although  I had to piece it.  I don't mind this a bit, in fact, I like being able to use what I have.  Plus, I could get no more of these if I wanted to...


So, I am not done.  Here is the border fabric.


Today is my birthday, and we just got back from lunch and a movie.  I am ready to get cracking on my new UFO !!

I would like to get this done quickly, as I want to make a Victorian outfit to wear to the Dickens Faire in San Francisco next month.  I haven't sewn garments in quite a while, so I want to take my time with it.


Place Mats are Finished

These were a lot of fun to make.  I did the straight line stitching with the Dual Feed Foot on my Janome Horizon.  I resisted the urge to quilt them to death!

Thanks again to Lisa at Shiner's View for her great tutorial!


Toy Hauler Place Mats

I made these place mats a few months ago for our Toy Hauler.  I have fabric left over to make some napkins.  I made these at the last minute, just before leaving for the Antique Motorcycle Run in Death Valley. 


Bread Bag

We love pistachios, and the ones we buy at our local Grocery Outlet come in these nice heavy cotton cloth bags.  I can't bear to throw them out, so I have been saving them.   I finally thought of something to make from them!

A few months ago I asked for a bread machine on Free Cycle, and I got one!  It works perfectly, and I have been making wonderful whole wheat bread all the time ever since. 

I have found that the bread doesn't like plastic bags, and does best wrapped in a dish towel.   So, I took apart two of the pistachio bags and combined them to make a bread bag! 

I also tried the Overcasting Stitch on my Janome Horizon to stitch the bag, which works great!  I have had the machine for close to two years, and have not used any of the specialty feet.   I have resolved to go through the book and try each one.

Anyway, here are some pics of my Pistachio Bread bags.  I plan to make a baguette bag as well, by sewing two of the bags end to end.


Tuesday, November 27, 2012

Place mats update

Quilting Practice Squares


Last night I put my most presentable practice squares up on my design wall just to see what they would look like.

The grouping kind of looks like a modern quilt! There are some in the drawer that I didn't put up because they were either my very first ones or I quilted over them several times or have some other unsightly defect.

Since they are all different shapes and sizes it might be fun to try to assemble them in an asymmetrical fashion!

Saturday, November 24, 2012

50 Fabulous Stars Quilt is Done!

I finished the binding today, and am putting on the label.  I have named it "Underneath the Stars"


Place Mats


Here are some fabrics I am auditioning for some place mats. I first saw a great tutorial for these over on Lisa's blog, Shiner's View.  I want to make these for my girlfriend, who already has made herself napkins with the green batik.   She also made some purple batik ones.

The green batik is her own leftover that she gave me, and the purple is one one from my stash that I think will match.  I think it will be really fun to give her these place mats with her own fabric in them!

The ivory background is linen.  I just remembered I had this!  It is cut from antique linen sheets I inherited from my grandmother.  I had used two of them to make our bedroom curtains, and the sheets were so long that I had to cut off 30" at the bottom of each.  Consequently I have more than enough to make 6 placemats.

Knowing Cherie, she will say, "Yikes, white!  These will get dirty!"   I made her two quilted pot holders some time ago and she refuses to use them!

Quilt Along #41 - Invasion of the Pods


I didn't have an actual quilt I could put this on, so I made it sample square. This was really fun. I used Paisley, Bed of Roses and stippling. 

Right after I did this, I read about using the plastic see through round quilting foot that came with my Janome Horizon.  It has guide lines on it, and is made to use for echo quilting!!   I plan to try it soon and post a comparison photo.  Echoing is not my strong suit, and the further apart the lines, the harder it is for me.

I think a bigger test piece would've shown up to pattern better but this did give me an idea of how to stitch it.

Friday, November 23, 2012

50 Fab Stars Quilt is almost done!

I finished assembling the sections last night, and right now I'm working on the binding.

I am so glad it's done and already have my next projects lined up!

Monday, November 19, 2012

Basic Swirl


Angela Walters' book, "Free Motion Quilting," arrived today from Amazon and I'm thrilled.  I opened the book to take a look and started drawing the first design on my new small dry erase board.  I found it very hard to draw, but when I made a practice sandwich and started to quilt it, it came together almost right away!  This is the first time I have "gotten it" with regard to changing directions with swirls.  Yay!  Not perfection by any means, but definitely progress.

Small dry erase board

I usually practice my designs on paper in a sketch notebook but this is a cool idea too

River Path on Section 3 of my "50 Fab Stars Quilt

Only one more to go!  These paper pieced blocks have been quite a challenge to quilt on a large scale, because of the busy patterns and colors as well as the thick seams.  But, once it is all together and washed, I am sure it will look great!

Another thing I realized last night was the importance of the batting.  I used a thin cotton batting from Joann's on this, which my Janome Horizon does not like very well.  I pulled out some old practice squares made with Warm and Natural or with Quilter's Dream Poly Select and stitched a bit on these, and my quilting was much better.

I am so glad I recently ordered 3 king size packs of Quilter's Dream Poly Select from Fabric Depot, at 30% off !!   I also orded the Kona Snow to get started on the Craftsy BOM with Amy.


Saturday, November 17, 2012

Circuit Board on Section 5 of my "50 Fab Stars" Quilt

One Block Wonder with Floral Master Fabric

Here are a few more photos of this quilt.  I used this weird lighting to highlight the quilting.


Zippling on Section 6 of "50 Fabulous Paper Pieced Stars" Quilt

I couldn't wait until Wednesday for another Quilt Buster, so I am using some of the previous designs from the Quilt Along to finish my 50 Fab Stars Quilt.

Zippling was easy to doodle, and a delight to quilt on the muslin test square.  But on these very busy blocks I got lost and trapped a few times.

I do love this design and look forward to trying it again on a project where I can see where I am going.  This was like driving in a snowstorm!


Test square


Quilting Board 2011 BOM: Star Sampler

I have tried to post all my quilting projects, but this one slipped through the cracks!  

I followed along month to month last  year on the Quilting Board, then  assembled it and did the FMQ this summer.  These are 12" blocks and the quilt was small enough to be pretty easy to quilt on my Janome Horizon 7700.  

 I like this photo of it because the sun is shining on it just so it really show the quilting.


I made the label with a Carol Doak paper pieced block and my Brother embroidery machine.


Thursday, November 15, 2012

Quilt Along #40 : Flower Power on Section 2 of "50 Fab Stars" Quilt


Here is Section 2 of my stars quilt using this week's homework assignment, Flower Power. This stitch was somewhat challenging because of all of the intersections on these paper pieced blocks.

On this particular section I used basting spray, which makes it look pretty flat with this cotton batting.  Once it is assembled and washed, it will be poofier.  I can really notice the difference between this section and the one I did using Matrix, which I pinned.

Monday, November 12, 2012

Quilt-Along # 39: Quilting in Sections with Matrix - Section 4 of "50 Fabulous Stars" Quilt

Leah's article last week about Quilt Busting was so timely for me.  These blocks are from Carol Doak's book and CD, 50 Fabulous Paper Pieced Stars. I have been working on them with a group on the Quilting Board, since January of this year. 

This is a 90" x 90" paper pieced quilt comprised of forty nine 12" blocks, which I have broken down into 7 sections.   The photo below shows the center section and it measures 36" x 36."  I think the all-over Matrix on this was a good choice for the very center of the quilt.

I had used Matrix before on a single 15" block and had even marked every line.  On this larger scale it was very scary and, as I quilted, I had doubts about having attempted it. Now that it is done, however, I am quite pleased with it.   There are many thick seamed intersections in this quilt and Matrix made it fairly easy to skirt around these.

At first I was turning the piece at the end of each line of stitching, then remembered seeing Leah quilt into the batting, break thread and start again at the top.  This allowed me to keep the bulk of the piece to the left of the needle, was much easier, and went faster.

Stitched on this larger scale, the quilt feels much softer than the others I have FMQ'd.  I have a tendency to "quilt them to death."  I am trying hard to let go of that on this quilt.

Leah, bring it on, I am ready for the next Quilt Buster, as I have six more sections to go.


Tuesday, October 30, 2012

Men's tee shirt transformed!

 I finally put a little thought into this (and research) and got a great result on my third shirt!! I can't wait to wear it!

I took in the sides, and also modified the neckline and the sleeves.

I had cut off the bottom when I bought it, since at the time I tucked it in, without making any other modifications, and so it stayed in the drawer and was never worn.  

After the modifications I decided it was too short to wear outside of my jeans, so I added the fringe. I like the way it looks on this Paris Harley tee shirt! Ooh la la!!


Tee shirt neckline

To modify the neckline, I cut off 1/2 of the knitted band, starched the neckline, and then turned it under 1/2", right on the line where the band attaches to the body of the shirt.  Then I pinned it in place and sewed it down using a decorative stitch on my machine, from the outside.  The stitch is stretchy and also keeps the turned-under raw edge from unraveling!    

I used the same decorative stitch on the sleeves after shortening them.

I will post photos of another, of a lighter color, so it will be more visible.


Tee shirt back

Wednesday, October 24, 2012

Quilt-Along # 36: Trapped Paisley

Here is a test piece I did for my one block wonder. I ended up using Goldilocks because the border is only 3" wide and the paisley was too dense. I do love this design however.

Saturday, October 20, 2012

OBW is finished !

I finished the binding this evening. I just have to make the label for it. The name of this quilt is Lucy in the Sky.

Wednesday, October 17, 2012

Quilt Along #35 - Goldilocks


I have finished doing the FMQ on the center of my OBW  (One Block Wonder quilt), as well as the 1" inner border.  As I was watching this week's Goldilocks video, I was thinking this might be an excellent choice for my 3" border. The photo below shows a sample of Goldilocks stitched on the actual border fabric of the quilt, with turquoise Isacord thread, as there is a lot of turquoise in the body of the quilt.

You can see the pieced top here and some of the quilting here.


Wednesday night I got brave and started stitching this design on the real border.  I finished binding it last night, and it just needs a label.  It was not easy to do in a 3" border, as the stippling is very small; it's harder to wiggle smoothly!


Sunday, October 14, 2012

First Attempts at FMQ

Just to put things into perspective, here are a few photos of my first attempts, in September of 2010.  I started watching Leah's videos, drawing the designs in my notebook, and making practice squares.  

I remember being pretty discouraged at the beginning, but with practice it got easier and easier.

I wish I had made my practice squares larger with nicer fabric, so I could have made a quilt from them.  Many of the later ones are very pretty, but plain, on muslin.